πŸš€ Quick Start Guide

β–Ό

Get up and running with SetClick Pro in 4 easy steps!

Step 1: Open the App

Click Launch App from any page or navigate to your installed PWA icon. The app opens instantly, no signup required! You can always open or reinstall SetClickPro at Setclickpro.com.

πŸ’‘ Installation Options

Install to home screen: iPhone/iPad (Safari: Share β†’ Add to Home Screen | Chrome: Share button top right β†’ Add to Home Screen), Android (Chrome Menu β†’ Install App), Desktop (Chrome/Edge install icon). Or bookmark in browser: Both methods work great! Installation gives you an app icon on your home screen, while bookmarking keeps it accessible from your browser tabs.

Step 2: Add Your First Song

  1. Click “Manage Songs” from the home screen
  2. Click the “+ Add Song” button
  3. Fill in the song details:
    • Title (required)
    • Artist
    • Duration (Minutes and Seconds)
    • Tempo/BPM (20-300)
    • Modified Tempo (optional – for real-time adjustments)
  4. Click “Save Song”

πŸ’‘ Pro Tip: Use Spotify Lookup

Click “Lookup Song Data” to search Spotify and auto-fill song details! Search by title and/or artist, select the correct version, and the details populate automatically.

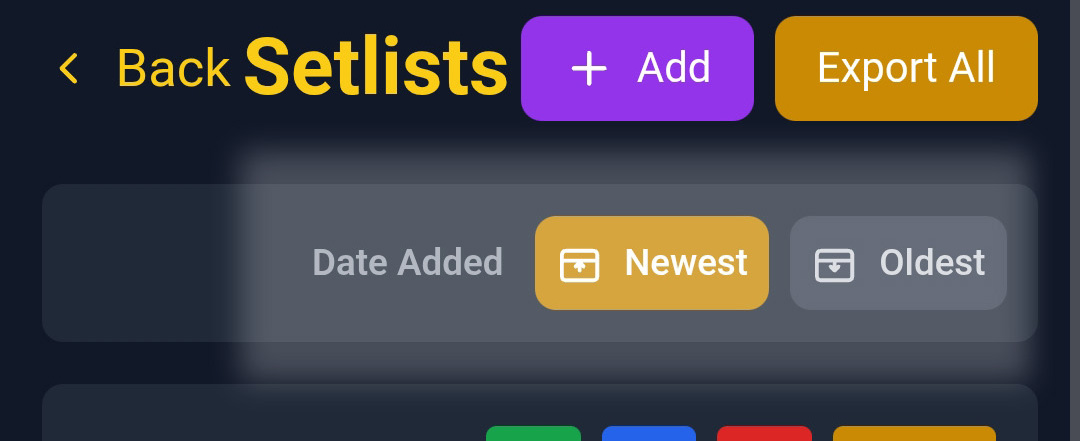
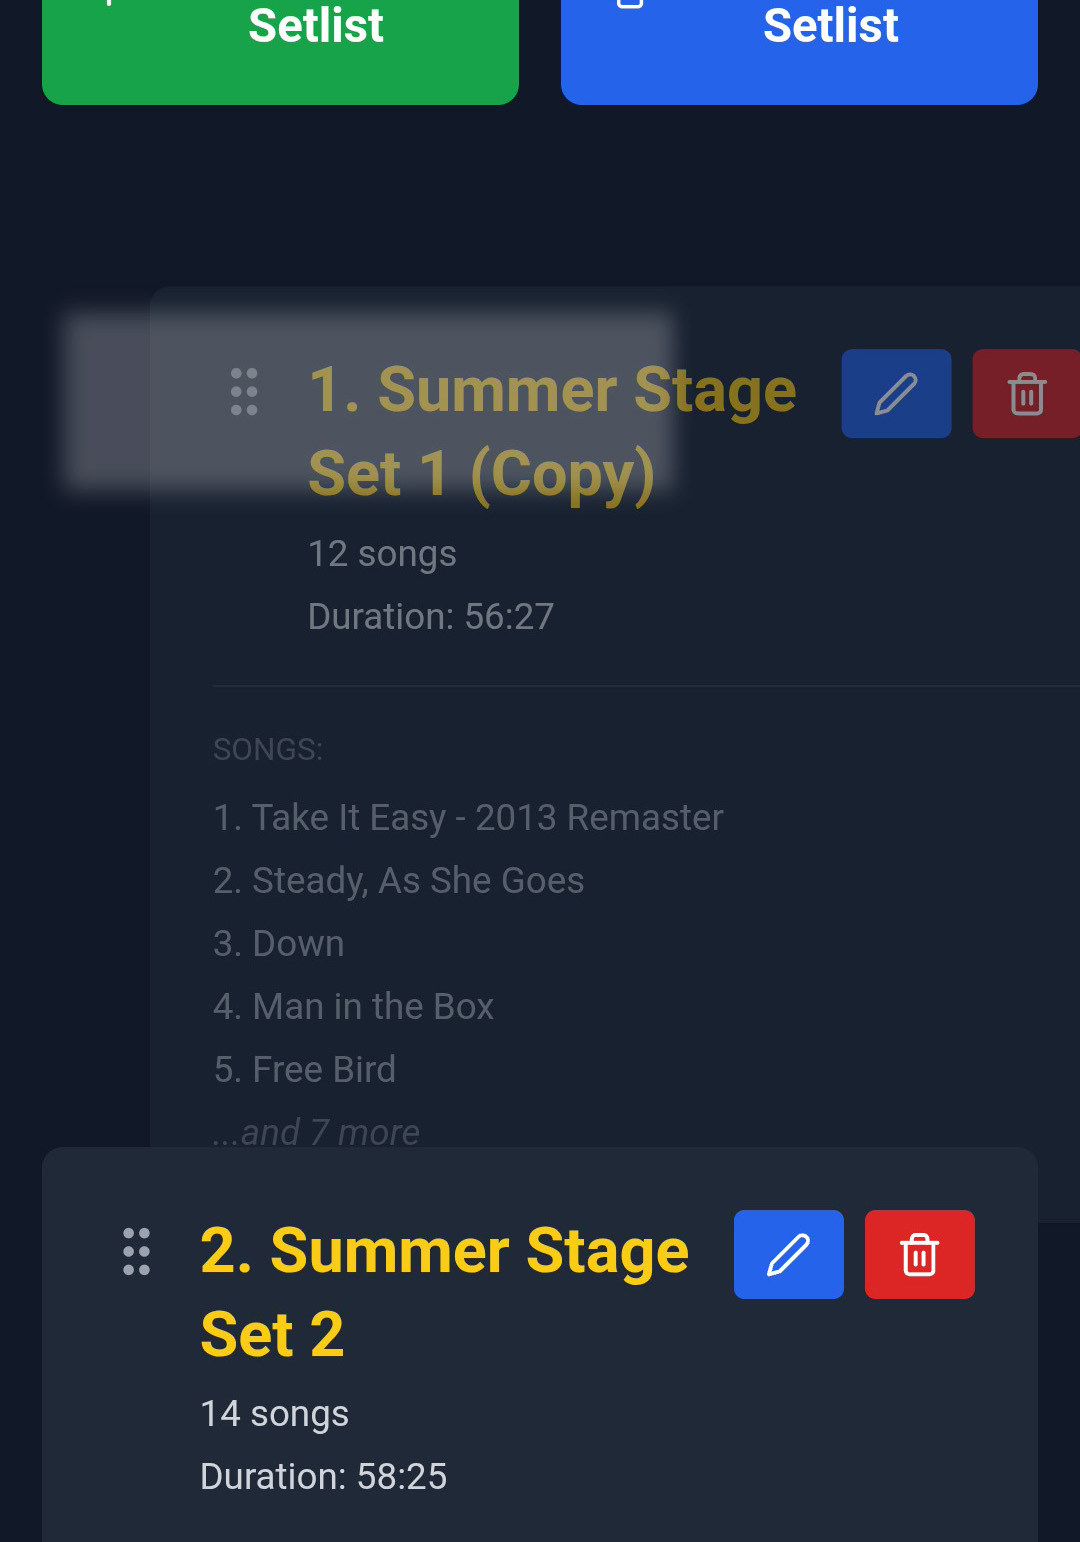
Step 3: Create a Setlist

  1. Return to home and click “Manage Setlists”
  2. Click “+ Create Setlist”
  3. Enter a name (e.g., “Friday Night Show”)
  4. Click “Save”
  5. Click your new setlist to open it
  6. Click “Add Songs” and select songs from your library
  7. Songs are removed from the “Available” list as you select them
  8. Drag songs to reorder them

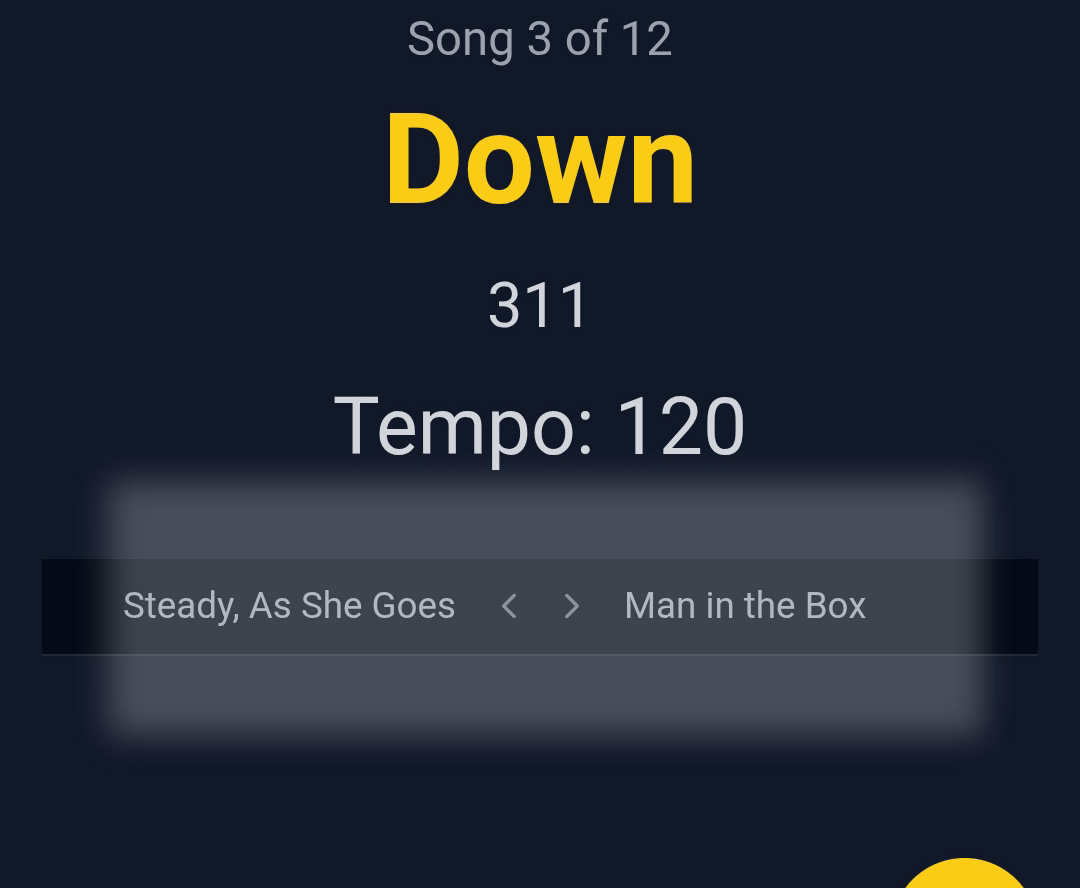
Step 4: Play Your Setlist

  1. From the home screen, click “Play Setlist”
  2. Select the setlist you want to perform
  3. Playback begins immediately – ready to start!
  4. When ready, press the “START” button to begin the click track
  5. Use Pause, Stop, Prev or Skip as needed

βœ… You’re All Set!

You now know the basics! Continue reading for detailed guides on all features, or jump to specific sections using the navigation on the left.

🎡 Song Management

β–Ό

Your complete song libraryβ€”add, edit, organize, and manage all your music in one place.

Adding Songs

You have three ways to add songs to your library:

  1. Manual Entry: Click “+ Add Song” and enter details yourself
  2. Spotify Lookup: Search Spotify’s database for professional metadata
  3. Bulk Import: Import multiple songs from a CSV file

Manual Song Entry

  1. Click “Manage Songs” from home
  2. Click “+ Add Song”
  3. Fill in the form:
    • Title: Song name (required)
    • Artist: Artist or band name
    • Duration: Minutes and seconds
    • Tempo/BPM: 20-300 BPM
    • Modified Tempo: Optional real-time BPM adjustment
  4. Click “Save Song”

Using Spotify Lookup

The fastest way to add songs with accurate metadata:

  1. While adding or editing a song, click “Lookup Song Data”
  2. Enter the song title and/or artist name
  3. Click “Search”
  4. Browse results, original recordings appear first
  5. Click “Select” on the correct version
  6. Song details auto-fill instantly!
  7. Click “Save” to add to your library

🎡 Search Tips

Title only: Returns many results – add artist to narrow down

Artist only: Shows most popular songs by that artist

Both: Most accurate results, finds exact version

⚠️ BPM/Tempo Lookup β€” Coming Soon

Song lookup currently retrieves title, artist, and duration from Spotify. Automatic BPM/Tempo retrieval is in active development and will be available in a future update. For now, enter the BPM manually after looking up a song β€” or use the Tap Tempo feature during single-song playback to dial it in by ear.

Editing Songs

  1. Find the song in your library
  2. Click the Edit button (pencil icon)
  3. Modify any field
  4. Click “Save”
  5. Or click “Cancel” to discard changes

You can also use Spotify lookup while editing to update song information.

Deleting Songs

  1. Find the song in your library
  2. Click the Delete button (trash icon)
  3. Confirm deletion

⚠️ Warning

Deleting a song removes it from all setlists. This action cannot be undone (unless you have a backup).

Searching & Sorting

Sort: Use the Song Title A-Z or Z-A button to sort all songs by Title

Sort: Use the Artist A-Z or Z-A button to sort all songs by Artist

See your total song count and other data stats in Settings

Date Added Tracking

SetClick Pro automatically tracks and displays the date each song was added to your library. You can see this information directly in the song list view. When you export your songs as a CSV, the date added is included as a column, making it easy to track when you expanded your repertoire or to sort and filter your library in a spreadsheet.

πŸ“‹ Setlist Management

β–Ό

Organize your perfect set with drag-and-drop simplicity.

Creating a Setlist

  1. Navigate to Manage Setlists from home
  2. Click “+ Create Setlist”
  3. Enter a descriptive name (e.g., “Friday Night – Rock Set”)
  4. Click “Save” OR continue by adding songs

πŸ’‘ Naming Tips

Use descriptive names that include venue, date, or set type. Examples:

  • “Main Street Tavern – Jan 15”
  • “Wedding Reception – Cocktail Hour”
  • “Festival Set 1 – High Energy”

Adding Songs to a Setlist

  1. Open the setlist by clicking pencil edit icon
  2. Select songs from your library by clicking “+” next to the song
  3. Selected songs appear in your setlist

Reordering Songs

SetClick Pro uses intuitive drag-and-drop reordering:

  1. Open the setlist by clicking pencil edit icon
  2. Click and hold the grip handle (six dots) on the left of any song
  3. Drag the song to its new position
  4. Release to drop

Removing Songs from a Setlist

  1. Open the setlist by clicking pencil edit icon
  2. Click the Red “x” in the “Setlist Songs” list to delete a song from the setlist
  3. Close the song picker when done
  4. The song is removed from the setlist (but stays in your library)

Viewing Setlist Details

Each setlist shows useful information:

  • βœ“ Song count: How many songs are in the setlist
  • βœ“ Total duration: Estimated total running time

Sorting Setlists

SetClick Pro makes it easy to find your most recent work. Setlists can be sorted newest-to-oldest by the date they were created. Look for the calendar icon in the setlist views β€” including when selecting setlists in Add Show, Play Show, and Play Setlist modes β€” to toggle date-based sorting. Your sorting preference is remembered between sessions.

Setlist sort by date β€” calendar icon highlighted

Duplicating a Setlist

  1. Find the setlist you want to duplicate
  2. Click the Duplicate button (copy icon)
  3. A new setlist is created with ” (Copy)” added to the name
  4. Edit the new setlist as needed

πŸ’‘ Use Cases for Duplicating

  • Create variations of the same set for different venues
  • Build similar sets with small modifications
  • Keep backup versions before major changes

Deleting a Setlist

  1. Find the setlist in your list
  2. Click the Delete button (trash icon)
  3. Confirm deletion

Note: Deleting a setlist does NOT delete the songs, they remain in your library.

Exporting a Setlist

Note: Using SetClick Pro as your “go to” Setlist Builder is easy and fast! You can export your Setlists as CSV files to open as a spreadsheet, share, or format for print.

  1. Go into Manage Setlists
  2. Look for the Export button on the right side of each Setlist bar
  3. Press Export on the Setlist you want to save
  4. On mobile devices the file will save in the Downloads folder. On Desktop/Laptop you will be prompted where to save the file
  5. Open the file in Google Sheets or Excel or open it with a text editor to create a printable Setlist

🎬 Show Management

β–Ό

Plan complete performances with multiple setlists, breaks, and encores.

What is a Show?

A Show is a collection of setlists for a complete performance. Perfect for:

  • Multi-set gigs (Set 1, Set 2, Encore)
  • Festivals with multiple time slots
  • Events with different music for different segments
  • Organized planning of your complete performance

Creating a Show

  1. Click “Manage Shows” from home
  2. Click “+ Create Show”
  3. Enter show details:
    • Show name (e.g., “Saturday Night Live Show”)
    • Venue (optional)
    • Date (optional)
  4. Click “Save”

Adding Setlists to a Show

  1. Open your show
  2. Click “Add Setlist”
  3. Select from your existing setlists
  4. Setlists appear in order
  5. Add as many setlists as needed

Reordering Setlists Within a Show

Just like reordering songs within a setlist, you can drag and drop your setlists into any order within a show:

  1. Open the show by clicking the edit (pencil) icon
  2. Click and hold the grip handle (six dots) on the left of any setlist
  3. Drag it to the desired position
  4. Release to drop β€” order saves automatically
Drag-and-drop reordering of setlists within a show

Viewing Show Details

Your show overview displays:

  • βœ“ Total show duration: Combined time of all setlists
  • βœ“ Number of setlists: How many sets in the show
  • βœ“ Total songs: Combined count across all setlists

Playing a Show

  1. From home, click “Play Show”
  2. Select your show
  3. SetClick Pro plays through each setlist in order
  4. Between setlists, you’ll see a transition screen
  5. Navigate between sets as needed

Duplicating a Show

Create variations of shows for different venues:

  1. Find the show you want to duplicate
  2. Click the Duplicate button
  3. A copy is created with ” (Copy)” in the name
  4. Modify as needed

▢️ Playback & Performance

β–Ό

Master the playback interface for flawless live performances.

Starting Playback

You can play individual songs, setlists, or complete shows:

Playing a Single Song:

  1. Go to Manage Songs
  2. Click the Play button next to any song
  3. Click track starts immediately

Playing a Setlist:

  1. From home, click “Play Setlist”
  2. Select your setlist
  3. Songs play in order

Playing a Show:

  1. From home, click “Play Show”
  2. Select your show
  3. All setlists play in sequence

Playback Controls

The playback screen provides complete control:

  • βœ“ START/PAUSE: Begin or pause the click track
  • βœ“ STOP: Stop playback and reset to beginning
  • βœ“ PREV (Previous): Go back to previous song
  • βœ“ SKIP (Next): Jump to the next song. The Skip button is also available before you start a song, so you can pass over a song in the queue without playing it first
  • βœ“ Fullscreen: Enter fullscreen mode for better visibility

🎡 Previous & Next Song Display

During playback, the titles of the previous and next song in your setlist are shown below the tempo display. This gives you a clear at-a-glance view of what’s coming up and what you just played β€” no need to memorize your set order!

Playback screen showing previous and next song titles below the tempo

The Click Track

SetClick Pro generates precision click tracks using Web Audio API:

  • Accuracy: Millisecond-level precision
  • BPM Range: 20-300 BPM supported
  • Click Sounds: 6 professional sounds to choose from (see Settings)
  • Visual Sync: Screen flashes in time with click (customizable)

πŸ’‘ Modified Tempo

If you’ve set a Modified Tempo for a song, the click plays at that tempo instead of the original BPM. Great for rehearsing songs faster or slower than the recorded version.

Tap Tempo

Not sure of the exact BPM for a song? Use Tap Tempo to figure it out by feel during single-song playback:

  1. Open a single song for playback (from Manage Songs)
  2. Tap the Tap Tempo button in time with the beat of the song
  3. SetClick Pro calculates the BPM using a rolling average of your last 4 taps
  4. The tempo display updates in real time as you tap
  5. Once you’ve dialed in the right BPM, save it to the song

πŸ’‘ Tap Tempo Tips

Tap at least 4 times for an accurate reading β€” the rolling average smooths out any inconsistencies. Tap Tempo is available in single-song playback mode only.

Tap Tempo button during single-song playback

Fullscreen Mode

Fullscreen mode maximizes visibility during performance:

  1. Click the Fullscreen button during playback
  2. Controls remain accessible at bottom
  3. Song info displays clearly
  4. Visual flash more visible
  5. Press ESC or tap exit to leave fullscreen

⚠️ iPhone Fullscreen Not Available

Due to iOS restrictions, the Fullscreen mode button is not available on iPhone. It works on iPad, Android, and all Desktop browsers. iPhone users can maximize the experience by installing the app to the home screen via Safari, which opens the app in a full-screen-like standalone view.

🎭 Performance Tips

  • Test fullscreen mode before your show
  • Increase screen brightness for better visibility
  • Place device in visible but secure location
  • Consider a device stand for optimal viewing angle

Screen Wake Lock

SetClick Pro automatically keeps your screen on while a click track is playing. No more screen going dark in the middle of a song! You don’t need to change any settings β€” this happens automatically during playback on supported devices (iPhone, Android, iPad, Desktop). When you stop playback, your device’s normal screen timeout resumes.

πŸ’‘ Keep Your Screen Visible

Even with Wake Lock active, it’s still a good idea to set your screen brightness to maximum before a show for the best visibility on stage.

Audio Output

Connect SetClick Pro to your monitoring system:

Common Setups:

  • In-Ear Monitors: Connect phone/tablet headphone jack to IEM system
  • Headphones: Direct connection for personal monitoring
  • PA System: Run click through monitor mix
  • Wireless: Bluetooth earbuds or transmitters (check for latency)

⚠️ Bluetooth Latency Warning

Bluetooth audio can introduce 100-300ms delay. For precision timing, use wired connections whenever possible. If using Bluetooth, test thoroughly before live use.

Performance Best Practices

  • Test your complete setup during soundcheck
  • Keep device charged – bring backup battery
  • Set device to “Do Not Disturb” mode
  • Have a backup device with same data loaded
  • Practice using controls before live performance
  • Verify all songs have correct BPM before the show

πŸ’Ύ Import & Export

β–Ό

Manage your song library with CSV imports and exports for easy data management.

Exporting Songs

Export your song library as a CSV spreadsheet:

  1. Go to Settings
  2. Under Export Data, click “Export Songs CSV”
  3. A CSV file downloads with all your songs

What’s Included:

  • Song ID (internal reference)
  • Title
  • Artist
  • Duration
  • BPM
  • Modified Tempo (if set)
  • Date Added

Use Cases for Export:

  • Back up your song library
  • Edit songs in spreadsheet software
  • Share library with band members
  • Transfer data between devices
  • Analyze your repertoire

Importing Songs

Import multiple songs from a CSV file:

  1. Prepare your CSV file (see format below)
  2. Go to Settings
  3. Under Import Data, click “Import Songs CSV”
  4. Select your CSV file
  5. Songs are imported to your library

⚠️ Important: Import Replaces All Songs

Importing replaces your entire song library! Export a backup before importing. This ensures you can restore if something goes wrong.

CSV File Format

Your CSV must have these columns in this order:

  1. id – Unique ID (leave blank for new songs, or use existing ID to update)
  2. title – Song name (required)
  3. artist – Artist/band name
  4. durationMinutes – Duration in minutes
  5. durationSeconds – Duration in seconds
  6. bpm – Tempo (20-300)
  7. modifiedBpm – Modified tempo (optional)

Example CSV:

id,title,artist,durationMinutes,durationSeconds,bpm,modifiedBpm
,Hotel California,Eagles,6,30,74,
,Sweet Child O' Mine,Guns N' Roses,5,56,125,
,Wonderwall,Oasis,4,18,87,90
                        

πŸ’‘ Tips for Creating CSV Files

  • Use Excel, Google Sheets, or Numbers to create/edit CSV files
  • Save as “CSV (Comma delimited)” format
  • Don’t change existing song IDs if updating songs
  • Leave ID blank for new songs – SetClick Pro assigns them
  • Ensure all required fields are filled

Bulk Song Management Workflow

The most efficient way to manage hundreds of songs:

  1. Export your current songs from SetClick Pro
  2. Open the CSV in spreadsheet software on your computer
  3. Edit songs, add new ones, remove unwanted ones
  4. Save as CSV format
  5. Import the updated file back into SetClick Pro
  6. Your library updates with all changes

Why this is powerful:

  • Add 100+ songs in minutes instead of hours
  • Use spreadsheet tools for sorting and filtering
  • Copy/paste from other sources
  • Make bulk edits easily

πŸ”„ Backup & Restore

β–Ό

Protect your data with automatic background protection and easy manual backups.

Automatic Backup Protection

SetClick Pro works hard to keep your data safe behind the scenes, so you don’t have to think about it. The app uses a multi-layer automatic backup system that runs continuously while you use it:

  • βœ“ Instant protection: A backup is triggered automatically a few seconds after any change you make β€” adding a song, editing a setlist, creating a show
  • βœ“ Periodic backups: The app saves a fresh backup every 5 minutes while it’s open, even if you haven’t made any changes
  • βœ“ Backup on close: A backup is saved automatically when you close or refresh the app
  • βœ“ Crash recovery: If your browser ever crashes or the app refreshes unexpectedly, your data is protected and recoverable
  • βœ“ Smart restore prompts: If SetClick Pro detects that data might be missing (for example after a browser cache clear), it will alert you and offer to restore from its backup automatically

πŸ’‘ Why You Still Need Manual Backups

The automatic system is your day-to-day safety net, but it lives on your device. If you switch browsers, get a new phone, or want to share your setup with a bandmate, you’ll need a manual backup file. Think of automatic backups as your airbag and manual backups as your insurance policy β€” you want both!

Creating Manual Backups

SetClick Pro includes a complete system backup feature to protect all your data:

  1. Go to Settings
  2. Under Export Data, click “Export JSON Backup”
  3. A JSON file downloads with all your data
  4. Save this file to a safe location

What’s Included in Backups

A complete backup contains:

  • βœ“ All songs in your library
  • βœ“ All setlists with song orders
  • βœ“ All shows with setlist configurations
  • βœ“ App settings and preferences
  • βœ“ All relationships between songs, setlists, and shows

Everything you need to restore SetClick Pro exactly as it was!

Restoring from Backup

Restore your complete setup from a backup file:

  1. Go to Settings
  2. Under Import Data, click “Import JSON Backup”
  3. Select your backup JSON file
  4. Confirm the restoration (this replaces all current data)
  5. SetClick Pro loads all your data instantly
  6. All songs, setlists, and shows are restored!

⚠️ Restoration Replaces All Data

Restoring from backup replaces all current data in SetClick Pro. Create a backup of your current state first if you want to keep it.

Backup Best Practices

  • Create backups regularly – Weekly recommended for active users
  • Store in multiple locations – Cloud storage (Google Drive, Dropbox, iCloud)
  • Backup before major changes – Before importing large datasets
  • Keep multiple versions – Don’t overwrite your only backup
  • Test restoring occasionally – Verify backups work before you need them
  • Label backups clearly – Include date in filename (e.g., “SetClickPro_Backup_2025-06-01.json”)

Common Backup Scenarios

Moving to a New Device:

  1. Create backup on old device
  2. Transfer backup file to new device (email, cloud, etc.)
  3. Open SetClick Pro on new device
  4. Restore from backup
  5. You’re instantly set up exactly as before!

Sharing Setup with Band Members:

  1. Create backup of your shows and setlists
  2. Share backup file with band members
  3. They restore from backup
  4. Everyone has identical setup

Recovering from Mistakes:

  1. If you accidentally delete important data
  2. Restore from your last backup
  3. All deleted data returns instantly

Backup File Format

Backup files are JSON format (.json extension):

  • Human-readable text format
  • Can be opened in any text editor
  • Contains all your SetClick Pro data
  • Usually 10-500KB depending on library size

πŸ’‘ Advanced: Editing Backups

Since backups are JSON files, advanced users can edit them in a text editor if needed. However, incorrect editing can corrupt the backup. Only edit if you understand JSON format!

πŸ“± PWA Installation

β–Ό

Install SetClick Pro as a Progressive Web App for offline access and app-like experience.

πŸ“² SetClick Pro Will Ask You!

The first time you open SetClick Pro β€” or any time the app doesn’t detect a prior installation β€” it will automatically prompt you to install. On Android and Desktop, you’ll see a native install button. On iPhone, you’ll receive step-by-step instructions for adding it to your home screen via Safari. Simply follow the prompts and you’ll be installed in seconds!

What is a PWA?

SetClick Pro is a Progressive Web App (PWA), which means it works like both a website AND a native app:

  • βœ“ Website: Opens in any browser instantly
  • βœ“ App: Can be installed to your home screen
  • βœ“ Offline: Works completely without internet
  • βœ“ Cross-platform: Same app on phone, tablet, computer
  • βœ“ No app store: Install directly from browser
  • βœ“ Auto-updates: Always get the latest version

Installing on iPhone/iPad

Using Safari (Recommended):

  1. Open SetClick Pro in Safari browser
  2. Tap the Share button (box with arrow pointing up)
  3. Scroll down and tap “Add to Home Screen”
  4. Edit the name if desired
  5. Tap “Add”
  6. SetClick Pro icon appears on your home screen!

Using Chrome:

  1. Open SetClick Pro in Chrome browser
  2. Tap the Share button (top right corner)
  3. Select “Add to Home Screen”
  4. Tap “Add”
  5. App icon appears on home screen

πŸ’‘ Accessing Installed App

After installation, tap the SetClick Pro icon on your home screen to launch the app. It opens fullscreen without browser UI, just like a native app!

πŸ” Can’t Find the App After Installing?

Depending on your device and how you installed it, SetClick Pro may appear on your home screen or in your device’s Installed Apps list (sometimes called the App Library on iPhone or App Drawer on Android). If you don’t see it on your home screen right away, check both places!

Installing on Android

  1. Open SetClick Pro in Chrome browser
  2. Tap the menu (three dots) in top right
  3. Look for “Install App” or “Add to Home Screen”
  4. Tap it and confirm installation
  5. The app installs to your home screen or app drawer

Alternative method: Some Android devices show an automatic install banner at the bottom of the screen. Just tap “Install” on that banner!

🎡 Android App Experience

On Android, installed PWAs work exactly like native apps. They appear in your home screen and/or your App Drawer (the full list of installed apps), can be organized in folders, and even show in your recent apps list. If you don’t see it on your home screen right away, check the App Drawer.

Installing on Desktop (Windows/Mac/Linux)

Chrome or Edge:

  1. Open SetClick Pro in Chrome or Edge browser
  2. Look for the install icon in the address bar (computer with down arrow)
  3. Click the install icon
  4. Click “Install” in the popup
  5. SetClick Pro installs as a desktop app!

Launching on desktop:

  • Windows: Start Menu > SetClick Pro
  • Mac: Applications folder or Launchpad
  • Linux: Applications menu

πŸ’» Desktop Benefits

Desktop installation creates a dedicated window with no browser tabs or address bar. Perfect for rehearsals or home practice sessions!

Benefits of Installation

Why install instead of just bookmarking?

  • βœ“ Fully offline: Works without any internet connection
  • βœ“ Faster loading: Instant access from home screen
  • βœ“ Full-screen experience: No browser UI distractions
  • βœ“ Easy access: One tap to launch
  • βœ“ Looks professional: Custom app icon
  • βœ“ Better performance: Optimized app experience
  • βœ“ Reliable: Less chance of accidentally closing

Browser Alternative

Don’t want to install? That’s perfectly fine!

Simply bookmark SetClick Pro in your browser. You get:

  • All the same functionality
  • Offline access (after first visit)
  • Easy access from browser bookmarks
  • No home screen icon needed

Both methods work perfectly! Installation gives you a dedicated home screen icon and app experience, while bookmarking keeps it accessible from your browser. Choose what works best for you!

Automatic App Updates

SetClick Pro keeps itself up to date automatically. The app checks for a new version once per hour in the background. When an update is available, you’ll see a notification letting you know a new version is ready. Tap to view the “What’s New” notes β€” a summary of what changed and what was added β€” and the app will reload with the latest version once you close the update notes. You always get the newest features and fixes without ever visiting an app store.

What's New update notification modal

Uninstalling (If Needed)

iPhone/iPad:

Long-press the SetClick Pro icon > Remove App

Android:

Long-press the icon > Uninstall (or drag to Uninstall area)

Desktop:

  • Chrome: Menu (three dots) > Uninstall SetClick Pro
  • Or: Remove like any other desktop app

Note: Uninstalling doesn’t delete your data – it’s still in your browser storage. Reinstalling brings everything back!

Troubleshooting Installation

“Add to Home Screen” option not showing:

  • Make sure you’re using a supported browser (Safari on iOS, Chrome on Android)
  • Try visiting SetClick Pro first, then look for the option
  • Some browsers hide the option until you’ve visited the site

Installation failed:

  • Check your internet connection during installation
  • Make sure you have storage space available
  • Try closing other tabs and apps
  • Restart your browser and try again

App not working offline:

  • Visit SetClick Pro online at least once first
  • Let it fully load before going offline
  • Check browser settings allow offline storage

βš™οΈ Settings & Features

β–Ό

Configure SetClick Pro and explore additional features.

Accessing Settings

  1. From the home screen, tap the Settings button (gear icon)
  2. Browse available options
  3. Changes save automatically

Click Sound Selection

SetClick Pro now offers 6 professional-quality click sounds so you can choose the one that cuts through your monitor mix best. To select and try sounds:

  1. Go to Settings
  2. Find the Click Sound section
  3. Browse the six options and read the descriptions
  4. Tap “Test” next to any sound to hear it before committing
  5. Select your preferred sound β€” it saves automatically

The six available sounds are:

  • βœ“ Default (Sine): Smooth, musical sine wave tone β€” the classic click
  • βœ“ Woodblock: Bright, percussive click with a natural wooden character
  • βœ“ Rimshot: Sharp attack that cuts through loud stage volume
  • βœ“ Cowbell: Hollow tone with rich overtones β€” distinctive and fun
  • βœ“ Triangle (3000 Hz): Bright metallic ping β€” great in a dense mix
  • βœ“ Clave (1500 Hz): Sharp percussive wood crack β€” punchy and clear

Your last selected sound becomes the new default every time you open the app.

Click Sound selection panel in Settings with Test buttons

πŸ’‘ Choosing the Right Click Sound

Test sounds through your actual monitor setup before the show. A sound that’s clear on phone speakers may be harder to hear through in-ears or a live wedge monitor. The Rimshot and Triangle tend to cut through the best in loud live environments.

Audio/Visual Cue Settings

You can customize how SetClick Pro delivers the beat cue to suit your setup and performance environment. Three modes are available:

  • βœ“ Click + Flash (Default): Both the audio click and the screen flash fire on every beat. The most visible and audible option for most situations.
  • βœ“ Click Only: Audio click only, no screen flash. Saves battery and is ideal when you’re focused entirely on what you hear rather than what you see.
  • βœ“ Flash Only: Screen flash only, completely silent. Perfect for silent stage setups, pit orchestras, or any scenario where you need a visual-only cue.

To change the mode, go to Settings and find the Audio/Visual Cues section. Your selection saves automatically.

Audio/Visual Cue mode selector in Settings

πŸ’‘ Flash Only for Silent Conducting

Flash Only mode is a powerful tool for music directors or conductors who want a private visual beat reference without any sound output β€” even if your device has no headphones connected.

Available Settings

Export Data:

  • Export JSON Backup β€” complete system backup
  • Export Songs CSV β€” song library as spreadsheet

Import Data:

  • Import JSON Backup β€” restore from a backup file
  • Import Songs CSV β€” bulk import songs from spreadsheet

Data Statistics:

  • View total song count
  • See total number of setlists
  • Check total shows created
  • Monitor your library growth

About:

  • App version information
  • Credits and acknowledgments
  • Links to documentation

Spotify Integration

SetClick Pro integrates with Spotify’s database for professional song metadata:

What You Get:

  • βœ“ Official song duration
  • βœ“ Artist information
  • βœ“ Album details
  • ⏳ Automatic BPM data β€” Coming in a future update

No Spotify Account Needed:

You don’t need a Spotify account or subscription to use the lookup feature. SetClick Pro uses Spotify’s public API to search their catalog.

πŸ’‘ Internet Required for Lookup

Spotify lookup requires internet connection. Once songs are added, they work completely offline. Do your song setup while online, then perform offline!

Data Storage

All your SetClick Pro data is stored locally on your device:

  • βœ“ Privacy: Your data never leaves your device
  • βœ“ Security: Stored in browser’s secure storage
  • βœ“ Persistence: Data saved even when you close browser
  • βœ“ Offline: Everything available without internet

⚠️ Important: Browser Data

Your SetClick Pro data is tied to your browser. If you clear browser data or use different browsers, you’ll need to restore from backup. Always keep backups!

πŸ’‘ Tips & Tricks

β–Ό

Pro tips to get the most out of SetClick Pro.

Workflow Optimization

  • Set up on computer, use on phone: It’s easier to add many songs and create setlists on a computer with keyboard and mouse. Export/backup, then restore on your phone for performances.
  • Use Spotify lookup liberally: Even if you know the BPM, Spotify data gives you accurate duration and artist info and saves time on manual entry.
  • Use Tap Tempo to nail the BPM: When adding songs manually, play the track through your speakers and tap along to lock in the exact tempo.
  • Create template setlists: Build generic setlists (e.g., “Rock Set Template”) and duplicate them for specific shows.
  • Weekly backups: Set a reminder to create backups every Sunday. Store in Google Drive or Dropbox.
  • Modified Tempo for practice: Use Modified BPM to slow down difficult songs while learning, then remove it for performances.

Live Performance Tips

  • Soundcheck your click: Always test volume, audio routing, and your chosen click sound during soundcheck
  • Have a backup device: Load SetClick Pro on a second device with the same data
  • Airplane mode: Put device in airplane mode to prevent call/notification interruptions
  • Screen brightness: Max out brightness for fullscreen mode and flash visibility
  • Battery management: Keep device charged, bring a portable battery pack
  • Practice transitions: Rehearse using Skip/Prev buttons before the show
  • Try different click sounds: Test all 6 click sound options through your actual monitor system before settling on one for a show
  • Flash Only for silent stages: If you need a totally silent stage, use Flash Only mode and position your screen where you can see it clearly

Organization Tips

  • Consistent naming: Use a standard format for setlists/shows (e.g., “YYYY-MM-DD – Venue Name”)
  • Venue-specific setlists: Create different setlists for different venue types (bars, weddings, festivals)
  • BPM ranges: Sort by BPM to build energy curves in your setlists
  • Show notes: Use setlist/show names to include notes (e.g., “Rock Set – High Energy – No Ballads”)
  • Sort by date to find recent work: Use the date sorting feature in setlist views to quickly find your most recently created or updated sets

CSV Management Tips

  • Use spreadsheet formulas: Calculate total durations, analyze BPM distributions
  • Bulk editing: Find/replace artist names, adjust all BPMs by percentage
  • Import from setlist websites: Copy/paste from setlist.fm or similar sites into spreadsheet
  • Share with band: Email CSV to band members so everyone has the same library
  • Version control: Date your CSV files (e.g., “Songs_2025-06-01.csv”)

Advanced Techniques

Multi-Device Setup:

  1. Set up complete library on your main device
  2. Create backup
  3. Transfer backup to all your devices (email, cloud)
  4. Restore on each device
  5. Now all devices have identical data!

Collaborative Band Planning:

  1. One person creates shows and setlists
  2. Export backup
  3. Share backup file with band members
  4. Everyone restores from the same backup
  5. Entire band has synchronized setlists

Template-Based Workflow:

  1. Create template setlists for different scenarios
  2. Duplicate templates when booking shows
  3. Customize for specific venue/audience
  4. Speeds up show planning dramatically

Keyboard Shortcuts (Desktop)

When using SetClick Pro on desktop, these shortcuts work during playback:

  • Space: Start/Pause click track
  • β†’ (Right Arrow): Skip to next song
  • ← (Left Arrow): Previous song
  • F: Toggle fullscreen mode
  • ESC: Exit fullscreen

Troubleshooting Common Issues

Click track not playing:

  • Check device volume isn’t muted
  • Verify BPM is set for the song (20-300)
  • Try refreshing the app

Data disappeared:

  • Did you clear browser data? Restore from backup
  • Using different browser? Data is per-browser, restore backup
  • Check if SetClick Pro shows a restore prompt on startup β€” it may have detected a backup automatically
  • Always keep recent backups to prevent data loss!

Spotify lookup not working:

  • Check internet connection
  • Spotify API might be temporarily down – try again later
  • Enter song data manually if urgent

Import failed:

  • Check CSV format matches required columns
  • Ensure file is .csv format, not .xlsx
  • Try exporting a sample first to see correct format

Click sound not audible on stage:

  • Try a different click sound β€” Rimshot and Triangle tend to cut through best in loud environments
  • Check your monitor mix level
  • Test through your actual IEM or wedge setup before the show, not just phone speakers

Getting Help

If you need assistance:

  • Review this User Guide for detailed instructions
  • Check the FAQ page for common questions
  • Visit the About page for more information

🎡 Happy Performing!

SetClick Pro is built by a working musician who understands your needs. Use these tips to make your performances smoother, your prep faster, and your timing perfect. Rock on!